 Tweet
Tweet
So like many first time water cooling hobbyists, I've built computers for a very long time and felt it was time to watercool my rig. In fact, I got the idea in my head after buying a case with a window. Had I been forward thinking about this, I would've bought a bigger case!
Hardware:
- Fractal Design Define R4
- i7 2600k / Asus p8z68 Pro-Gen 3 / Corsair Vengeance Ram
- 2 SSDs / 1 WD Black Caviar / Lampotron FC
- EVGA gtx 680
Watercooling Hardware
- XSPC Raystorm CPU block
- Heatkiller 680gtx Full cover block w/ backplate
- Swiftech micro res
- D5 vario w/ Bitspower acrylic pump top
- XSPC 240 Rad
- XSPC 280 Rad
- Feser 4-packs fittings (multiple) and 45 angle
- Bitspower angled fittings and other fittings
- Darkside cables with Cobra Orange UV.
- Noiseblockers black silent pro pk-3 140mm x2 / GT AP-15 x2 / Yate Loon 120 UV Blue LED x1
- 3/5-5/8 UV blue tube
- two packages of UV cold cathodes.
Purchased all of my water cooling parts (except the switftech res, noiseblockers and GTs from Dazmode) - multiple orders, multiple mistakes.
I followed the MNPC guide on modding the Define R4 so that it fits a 280 rad at the front and offset the 240 rad up top using the honeycomb holes so that it would clear my Ram. My goal with this build was to make something that I found aesthetically pleasing - that meant straight tube runs. This was an expensive goal (more on this later)
Both rads are set as intake and only the back fan is outtake. This has resulted in great CPU / GPU temps, but horrible case temperatures. I'm debating whether to switch the GT's at the top to outtakes.
Pictures
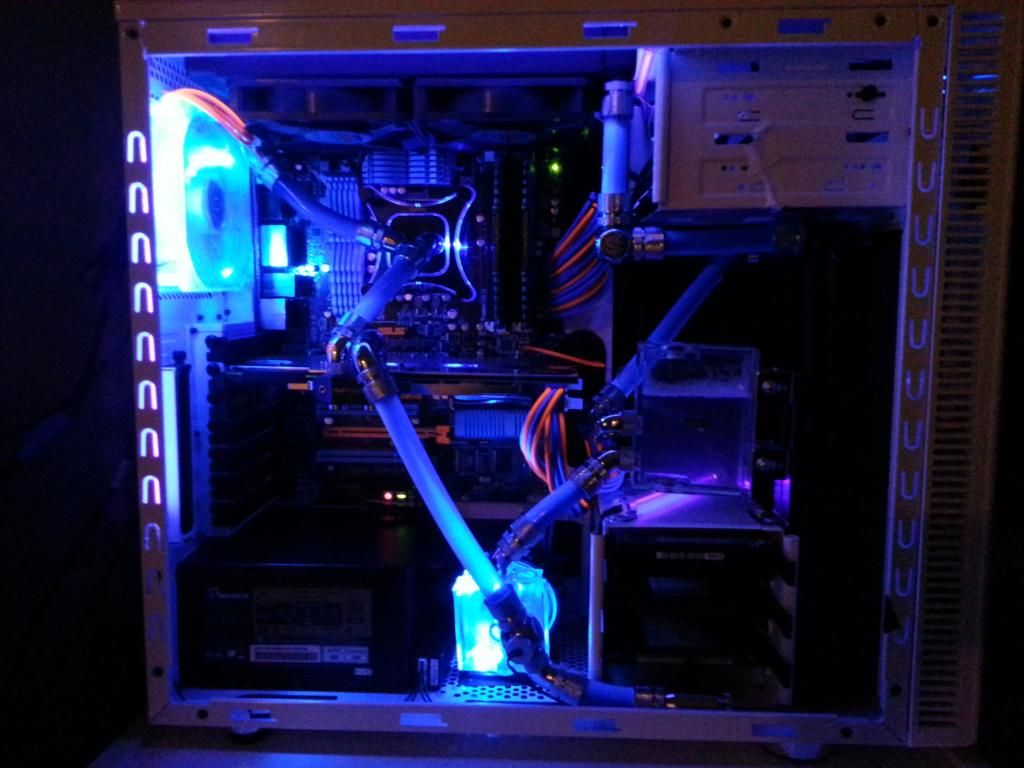
So there she be in all her glory. The cobra orange UV sleeving doesn't look as nice in the pic as it does sitting next to it. It really jumps out. In fact, my camera (my phone) doesn't really capture UV lighting that well. I took a flourescent highlighter and drew on the white PCI-E socket and the asus logo to add more of the highlight colour.
More pics:
http://i16.photobucket.com/albums/b2...ps87489d38.jpg
http://i16.photobucket.com/albums/b2...psdcafa9a8.jpg
http://i16.photobucket.com/albums/b2...psb5f773e5.jpg
http://i16.photobucket.com/albums/b2...psdbb4a149.jpg
This was what I started with before beginning my water cooling obsession:
http://i16.photobucket.com/albums/b2...psfccbcb45.jpg
Things I learned:
Maybe these things will help other first time builders.
1. Medium cases suck for water cooling. I wish I had more room.
2. Putting the drain on the output of the pump only drains one side of the loop. I need a another method to drain the res (will address when I have to do maintenance).
3. Had to use needlenose pliers to pry and expand the tube before I could get it on the barb part of the fitting. The youtube vids makle it look so easy, but it was not!
4. Sleeving sucks! It looks great though... lI guess it can't all be fun and games. Sleeving isn't difficult necessarily, it's just time consuming. Patience is not just a virtue for this task, but required.
5. You can never have too many rads. At first, based on Daz's youtube vid, I was only going to use one 240 since his youtube vid recommended 120 per block. However, since my temperatures fluctuate very little for my processor with a 240 and 280, I'm beginning to think that getting more rads is worth the extra $100 or so in rad/fittings/tube.
6. Fittings are expensive! Fittings are budget-busters, whatever you plan for, you end up needing more fittings. Of course, my build used a bunch of fittings to just avoid bends in the tube, but still... I hate the actual arcs and loops and think the no-bend setup looks cleaner.
7. Research more! I wasted about $30-40 on parts/pieces I probably won't use in this computer. Luckily I have another computer that I will get around to water cooling, but due to lack of planning, measuring and reading resulted in some wasted money.
8. Really not sure if I should've gone for a DDC pump or bay res with pump. Since the Define R4 only has 2 5.25 bays, I opted against the bay res / pump combo. edit: didn't finish this thought, the d5 is pretty big and positioning inside the define r4 was problamatic since it was what defined how the rest of my loop would be routed.
9. The Swiftech Micro Res is great. I had the option of mounting it in 3-4 places in my case. Although I really wanted a tube res (because they look badass), this micro res was very friendly for a small case. I had planned on screwing it into a PCI cover on the define R4 which is isolated from the MB, or drilling some holes and hanging it from the 5.25 bays. Really a versatile res.
10. I had no syringe or anything, so I bought a new baster (the thing you baste turkey with) and just, errm, basted the res with daz protector + distilled water.
I think the two biggest lessons to take away from this little adventure is that 1, Get a big case. It makes life much easier giving you much more options in mounting stuff. 2, your budget is a best guess for your first go around. I learned a lot about what planning is needed, I have an idea on measurements how things fit together so will not need to order so many times. I paid 4x shipping when I probably should've only paid 2x shipping due to my lack of planning and experience.
Oh yeah, that heatkiller 680 full block is a beast. Dropped 15C on temps from the HSF that it came with and looks amazing.
Anyway, thanks for everything. I figured I'd share my build since I bought all my stuff here and read/learned a lot from these forums and other posters.
Hardware:
- Fractal Design Define R4
- i7 2600k / Asus p8z68 Pro-Gen 3 / Corsair Vengeance Ram
- 2 SSDs / 1 WD Black Caviar / Lampotron FC
- EVGA gtx 680
Watercooling Hardware
- XSPC Raystorm CPU block
- Heatkiller 680gtx Full cover block w/ backplate
- Swiftech micro res
- D5 vario w/ Bitspower acrylic pump top
- XSPC 240 Rad
- XSPC 280 Rad
- Feser 4-packs fittings (multiple) and 45 angle
- Bitspower angled fittings and other fittings
- Darkside cables with Cobra Orange UV.
- Noiseblockers black silent pro pk-3 140mm x2 / GT AP-15 x2 / Yate Loon 120 UV Blue LED x1
- 3/5-5/8 UV blue tube
- two packages of UV cold cathodes.
Purchased all of my water cooling parts (except the switftech res, noiseblockers and GTs from Dazmode) - multiple orders, multiple mistakes.
I followed the MNPC guide on modding the Define R4 so that it fits a 280 rad at the front and offset the 240 rad up top using the honeycomb holes so that it would clear my Ram. My goal with this build was to make something that I found aesthetically pleasing - that meant straight tube runs. This was an expensive goal (more on this later)
Both rads are set as intake and only the back fan is outtake. This has resulted in great CPU / GPU temps, but horrible case temperatures. I'm debating whether to switch the GT's at the top to outtakes.
Pictures
So there she be in all her glory. The cobra orange UV sleeving doesn't look as nice in the pic as it does sitting next to it. It really jumps out. In fact, my camera (my phone) doesn't really capture UV lighting that well. I took a flourescent highlighter and drew on the white PCI-E socket and the asus logo to add more of the highlight colour.
More pics:
http://i16.photobucket.com/albums/b2...ps87489d38.jpg
http://i16.photobucket.com/albums/b2...psdcafa9a8.jpg
http://i16.photobucket.com/albums/b2...psb5f773e5.jpg
http://i16.photobucket.com/albums/b2...psdbb4a149.jpg
This was what I started with before beginning my water cooling obsession:
http://i16.photobucket.com/albums/b2...psfccbcb45.jpg
Things I learned:
Maybe these things will help other first time builders.
1. Medium cases suck for water cooling. I wish I had more room.
2. Putting the drain on the output of the pump only drains one side of the loop. I need a another method to drain the res (will address when I have to do maintenance).
3. Had to use needlenose pliers to pry and expand the tube before I could get it on the barb part of the fitting. The youtube vids makle it look so easy, but it was not!
4. Sleeving sucks! It looks great though... lI guess it can't all be fun and games. Sleeving isn't difficult necessarily, it's just time consuming. Patience is not just a virtue for this task, but required.
5. You can never have too many rads. At first, based on Daz's youtube vid, I was only going to use one 240 since his youtube vid recommended 120 per block. However, since my temperatures fluctuate very little for my processor with a 240 and 280, I'm beginning to think that getting more rads is worth the extra $100 or so in rad/fittings/tube.
6. Fittings are expensive! Fittings are budget-busters, whatever you plan for, you end up needing more fittings. Of course, my build used a bunch of fittings to just avoid bends in the tube, but still... I hate the actual arcs and loops and think the no-bend setup looks cleaner.
7. Research more! I wasted about $30-40 on parts/pieces I probably won't use in this computer. Luckily I have another computer that I will get around to water cooling, but due to lack of planning, measuring and reading resulted in some wasted money.
8. Really not sure if I should've gone for a DDC pump or bay res with pump. Since the Define R4 only has 2 5.25 bays, I opted against the bay res / pump combo. edit: didn't finish this thought, the d5 is pretty big and positioning inside the define r4 was problamatic since it was what defined how the rest of my loop would be routed.
9. The Swiftech Micro Res is great. I had the option of mounting it in 3-4 places in my case. Although I really wanted a tube res (because they look badass), this micro res was very friendly for a small case. I had planned on screwing it into a PCI cover on the define R4 which is isolated from the MB, or drilling some holes and hanging it from the 5.25 bays. Really a versatile res.
10. I had no syringe or anything, so I bought a new baster (the thing you baste turkey with) and just, errm, basted the res with daz protector + distilled water.
I think the two biggest lessons to take away from this little adventure is that 1, Get a big case. It makes life much easier giving you much more options in mounting stuff. 2, your budget is a best guess for your first go around. I learned a lot about what planning is needed, I have an idea on measurements how things fit together so will not need to order so many times. I paid 4x shipping when I probably should've only paid 2x shipping due to my lack of planning and experience.
Oh yeah, that heatkiller 680 full block is a beast. Dropped 15C on temps from the HSF that it came with and looks amazing.
Anyway, thanks for everything. I figured I'd share my build since I bought all my stuff here and read/learned a lot from these forums and other posters.


 to the deep end of PC cooling and DazMode Forums fuji !!

Comment